I am thankful for…
many things, but especially dessert
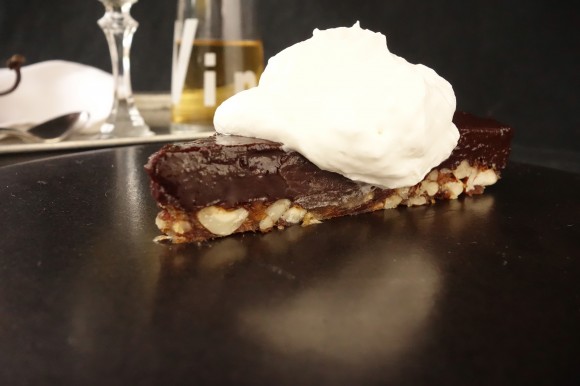
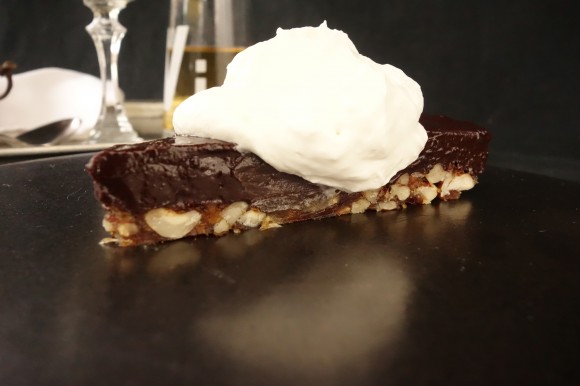
my nutty, chocolaty (gluten free) tart with brandied cream
I inherited my father’s affinity for sweets. At no time is this truth put to the test more than during the holiday season. For all of you who appreciate the sweet things in life as I do, and especially for those of you living a gluten-free lifestyle, this tart is for you. This week we are headed to the table with a delicious way to complete our Thanksgiving meal with a nutty, chocolaty (gluten free) tart with brandied cream.
à table !
LM
This week’s recipe combines many of my favorite things — healthy oils, natural sugars and antioxidants — also known as nuts, dates, and chocolate. It reminds me of turtles. Not the amimal, but the candy. I remember my father and his brothers exchanging and breaking out the boxes of turtles during the holidays. It was a tradition for them filled with nostalgia and turtles held the same footing as candy canes and fudge.
If you have not had a “turtle,” it is a pecan covered in caramel and then covered in chocolate. I have not seen them in California (or Paris for that matter). When I was thinking of gluten-free dessert preparations for the holidays, the flavor pairing of turtles came to mind.
Gluten-free dessert recipes either make a crust using a non-wheat flour (buckwheat flour or nut flour are two examples) or avoid flour altogether and use dates, figs, caramel, or a combination, as a substitute. I chose the latter. Dates, with their natural sugar, have caramel overtones. They are easier to use than caramel.

This tart is simple in its ingredients and its preparation. It is made from nuts, dates, chocolate, whipping cream and egg yolks (the yolks you can even omit if you want). It is as rich and decadent as it sounds.
It is preferable to use a springform pan (as you would for a cheesecake) because it makes it easier to remove the tart and serve.
There is only 15 minutes oven time. To speed things up even more (or if the dates are not dry) omit the egg yolks and the oven time. If the dates are soft and not dry, you need to do this because the moisture from soft dates will leach into the chocolate and create holes in the chocolate filling. Without the yolks, the filling will not be as custardy and rich, but the tart will still be good. Either way, the recipe is a winner.
For all of those with a sweet tooth … enjoy. I threw in a little brandied whipped cream just because…
à table (come to the table)
LM
my nutty, chocolaty (gluten free) tart with brandied cream
If your dates are soft (they should be a little wrinkled, not smooth) and you do not have time to dry them,
omit the egg yolks and the 15 minutes oven time and continue with the rest of the recipe.
makes one tart
(serving 12-14 happy people)
equipment
9” springform pan
parchment paper
rolling pin
scissors
shell
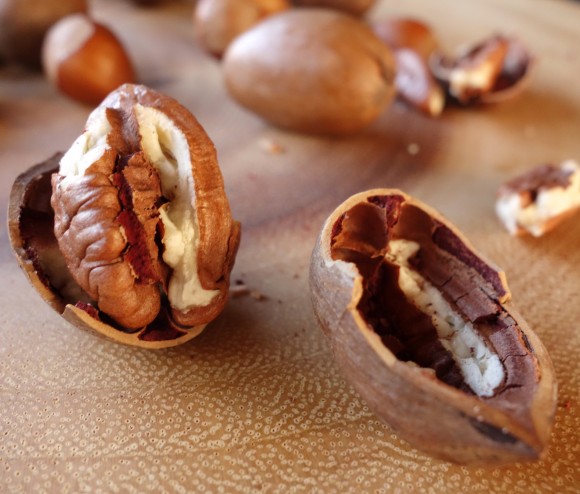
3 ounces (85 g) chopped raw pecans
2 ounces (57 g) chopped raw hazelnuts, skins removed
8 ounces (227 g) dried Honey or Medjool dates, pits removed
filling
8 ounces (240 ml) heavy whipping cream
15 ounces (425 g) finely chopped dark chocolate (I prefer 66% Valrhona)
1” piece fresh vanilla pod
3 fresh egg yolks, room temperature
whipped cream
1 cup (240 ml) heavy whipping cream
2 tablespoons powdered sugar
1 tablespoon brandy
how to:
- Whip Cream. Place 1 cup heavy whipping cream in the bowl of a stand alone mixer fit with a whisk attachment. Turn on high. Add the brandy and the sugar. Whip until the cream holds peaks. Place the whipped cream in an airtight container and place in the refrigerator until service. This can be done in advance.
- Oven. Preheat the oven to 300 degrees Fahrenheit (150 degrees Celsius).
- Toast Nuts. Place the nuts in the pan over a medium flame. Once the nuts begin to toast (and the oils are beginning to release) remove the pan from the heat and place the nuts in a bowl. Do not burn the nuts (if you do, you must start over).
If your hazelnuts still have their skins, place the nuts (whole) in a pan on the stove over a medium flame. When the nuts are turning golden brown and the skins are cracking, turn off the flame and pour the nuts on a clean dishcloth on a flat surface. Fold the cloth over the top of the nuts and use your hands to rub the nuts back and forth between the cloth. The friction will remove the skins. Discard skins and use a chef’s knife to crush/chop the nuts. Add the hazelnuts to the bowl with the toasted pecan pieces.
- Prepare Dates. Remove the pits and stems from the dates. If the dates are really soft and sticky, you need to dry them out (if they are too soft the moisture will leech into the chocolate when baking). To dry dates, place them on a baking sheet and set them in the sun or in the oven at a temperature of 150 degrees Fahrenheit (65 degrees Celsius). Once dry, use a chef’s knife to chop the dates into pieces. Add them to the nuts.
- Make The Crust. Use your hands to combined the nuts and the dates. Form a ball and press into a round disk. Place the disk between two sheets of parchment paper on a flat surface. Use a rolling pin to roll the disk into a crust ¼“ thick. Place the springform pan bottom on top of the crust as a guide and cut the crust to the pan size using scissors (I dare you to not nibble on the cut-away pieces). Spray the bottom of the pan with nonstick baking spray (or use a fresh parchment paper cut to fit inside the pan). Place the crust inside springform pan. Place the crust in the refrigerator to keep the dates firm until you bake it.
- Filling. Place the chocolate into a heat-proof bowl. Put the cream in a saucepan and scrape the seeds from the vanilla pod piece and add seeds and pod to the cream. Scald the cream. Remove the vanilla pod and discard. Add the hot cream to the chocolate and use a whisk to incorporate the two. When the chocolate has melted and there are no lumps, whisk in the egg yolks one by one. Remove the date crust from the refrigerator. Place on a rimmed baking sheet lined with parchment paper. Pour the chocolate into the springform pan on top of the crust. Use a spatula to get every bit of chocolate out of the bowl. Place the tart in the oven for 15 minutes. Remove from the oven. Let cool (don’t worry if they are little bubbles in the chocolate on the side). You can make the tart the day in advance (store it in the refrigerator overnight). If the filling is difficult to cut cleanly, chill the tart in the refrigerator before service. Serve with a generous spoonful of brandied cream.
bon appétit !

Tags: easy desserts, gluten free, Tart, Thanksgiving


Leave a Reply